Pirate Island
Items needed:
5000 coins
1 Salt block (can get it by dropping cloth on Dae shore beach)
2 full Water jugs (from pirate events or from carpenters)
To avoid having to return to Pirate Island several times bring along all of the needed items before you head for Hausson.
1. Head to Hausson and walk to the end of the pier in Northern Shores and say "Water jewel". (If you are asked to pay for passage to Hausson, you walked too far! Hit ESC (escape) to close the pop-up box.) You will be asked to spend 5000 coins to take a ride to Pirate Island. Agree to do this.
2. Get a Rusty Key by killing rats. Start killing in the second room of the Mines for a better chance of getting a key quickly. (You can borrow a Rusty key instead of hunting for one.)

3. Go to the first room to use the key on one of chests. You will get a Rock pick. The chests are behind the slotted walls on the east and west sides. If you use cntrl-r you will be able to see exactly where they are. (You can borrow a Rock pick which means you don't need a Rusty key at all!)
4. Go to the room in the center of the mine. There are no rats in that room. You need 10 Mine rocks. Drop and pick up your Rock pick until you gather 10 rocks.

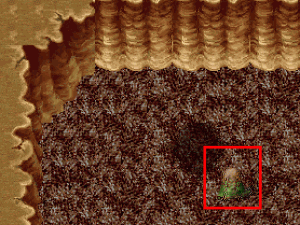
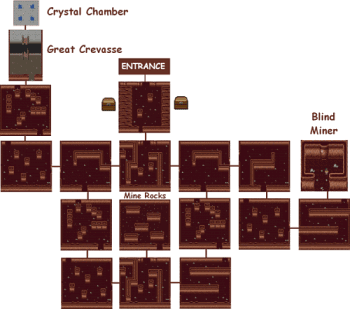
5. Now go to the far east end of the cave to find the Blind Miner (see the map). Say the following to him and wait for his reply each time:
- crevasse
- escape
- rope
- rock
|
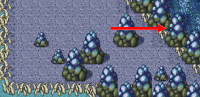
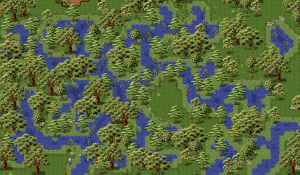
6. The Blind Miner will take your Mine rocks and give you a rope. Now head for the far west end of the cave (see the map) and the Great Crevasse.

7. Walk along the left or right side of the Great Crevasse. Your rope will let you swing over the gap to the top of the room. Go through the north door to enter the Crystal Chamber.
Crystal Chamber
Items needed:
1 salt block, 2 full water jugs
1. Stand in one of the water fountains. Drop one of the Water jugs. The Salt block in your inventory will start to form a crystal which becomes a Water jewel.
2. You can go find something to do because you have to wait between 8 and 10 Nexus hours (which is between 60 and 73 minutes of real time). If you leave, it will cost you another 5k for the trip! It is best to wait the full time is up just to be sure. After 10 Nexus Hourse, drop the other Water Jug. Your new Water jewel will appear in your inventory and you get a new legend mark. (You no longer get a legend mark for this part of the quest.)


Swamp Tree
Items needed:
200 coins, 1 acorn
1. Take an acorn with you to Buya's
Mage Guild (0126, 0035). Say "Sute" to the Guild master and pay 200 coins to receive "Sute dye" which you must have to enter Sute's Cave (0104, 0123).
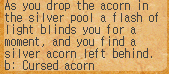
2. Enter Sute's cave which is located east of Buya North Gate and proceed to the second room called Barren Graves. On the northeast corner (0030, 0000) there's a glimmering, silver pond. Drop the acorn there and it will become a cursed acorn. Pick up the Cursed Acorn.
3. Go to the Woodlands which you can reach by exiting Nagnang at the west gate. Go to the far southwest corner where it is all swampland. Walk around dropping your Cursed Acorn like you are mining until it says you find a spot to bury it. It tells you to wait a while and see what happens. Be sure to make a note of your co-ordinates because you will have to come back to that spot later on.
4. You have to wait a Nexus day (3 hours real time) for the
tree to grow, so go do something else to pass the time. When the time is up, return
to the swamp area and the co-ordinates where you dropped the cursed acorn. (Logging
off or leaving the server wont affect anything in the quest.)
5. You have to kill the Swamp Tree but magical attacks
do nothing! Use any type of weapon to attack the tree. Your status box will record
your progress by saying:
The tree is starting to look a little worn.
You can see some cracks forming in the tree trunk.
As your last blow hits the tree it shatters, and you find a wooden staff.
You will now have a Wooden staff in your inventory. Don't worry that anyone else
will kill your tree if you do not get back in time. Only the one who planted the
tree can kill it.

Desert
Items needed:
1 Amethyst, 1 Dark amber, 1 Hot coal (coal and flash dust), 26 Water skins, 16,000 coins
1. How to make hot coal: Buy Coal from Gruff Smith
in Sanhae Village (20 coins). Buy Flash dust from any arena shop (5 coins). Use the creation system to combine the two items to make hot coal. (Shift + i starts the creation system)
2. How to make a Dragon Shard: Go to
Claw's cave in Buya (0128, 0120) and say Dragon, then say Earth Dragon and finally say Shard. Claw will mention that Baegi can make the Dragon shards. Take an Amethyst to Baegi's shop in Kugnae (0061, 0207) which is due west from the south gate inside the city walls.Say Shard. Baegi will make a Dragon Shard for 2000 coins.

3. Parcel the Dark Amber, the Hot coal and the Dragon
shard to yourself.
4. You must have a completely empty inventory when you go to either Buya or Kugnae Rabbit caves. Kill Dark wolves until you get 26 Wolf pelts.

5. Go to
Gan's Shop in KaMings Encampment via the main map. Say Desert then Water skin.
6. While still in KaMings Encampment go to
Sya's Shop. Say Water skin. Sya charges 500 coins for every empty water skin she makes out of the Wolf pelts. It will cost 13,000 coins to make the 26 empty water skins you need.
7. You'll need lots of water so fill the water skins in Kugnae's water pool (0030, 0030). Drop the water skins one by one until all are full.
8. Go to the southwest corner of Mythic. You will see Thirsty Ogres walking around. (The Thirsty Ogres are very easy to kill and they can barely hurt you.) Enter the Desert Cave. From now on, each new room you enter will use all of the water in one skin. You will need ALL 26 skins so be very, very careful. If you run out of water and go to another room you will die.
Follow these directions EXACTLY!
South 3 times
East 1 time
South 3 times
East 4 times
South 5 times
West 4 times
South 6 times
If you haven't taken a wrong turn you will be at an Oasis. Walk in front of the water and your water skins will refill automatically.
Follow these directions EXACTLY!
East 14 times
South 1 time
East 1 time
This brings you to another Oasis where you can refill your water skins.
Follow these directions EXACTLY!
West 1 times (yes you will back track 1 room)
North 3 times
West 2 times
North 4 times
East 6 times
North 6 times
East 1 time
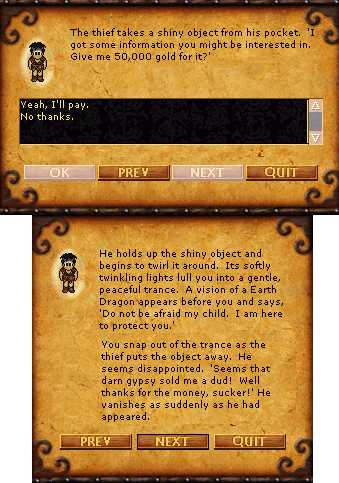
9. You will arrive at the Gypsy camp which has another oasis. Don't refill your water skins. You may not need them again and you cannot drop or deposit full water skins. If you need to go back to the Desert you can always fill the skins in Kugnae.

Talk to the Gypsy father who is south of the tent.
Say "Soo"
Say "Ogres"
Say "Son"

You must drop 3 empty water skins now. Go to the Gypsy boy who is near the Oasis. Say Ogre to the boy. Now you can click him to receive the items your parcelled to yourself (Dark amber, Hot coal and Dragon shard).
11. Go inside the tent to talk to the Gyspy Mother. Say curse. She will ask you for your Dark amber and for 1000 coins so you can get past the curse at the entrance of the cave at the north end of the camp. Once you have paid this fee, you never have to do it again no matter how many times you enter the cave!
12. There are hungry dragons inside the cave. There are also several rooms with mounds in them(see below). Exit the first room to the north to get to the Dragon Mounds. Walk to the door and it will scoop you up into the next room.
13. Avoid the dragons in the room! Drop the hot coal behind one of the mounds to awaken an Earth Dragon. Quickly use the Dragon Shard to capture the Earth dragon. The Earth shard will appear in your inventory! (You no longer get a legend mark for this part of the quest.)
Learn to Read Ogrish
Items needed:
1 Axe, must have completed the Freed Leviathan quest, enough free inventory slots
to hold everything you are wearing, 10,000 coins
1. Enter the Western Forest from the Wilderness (0003, 0100). Use your Axe to cut through the thick bushes.
You can walk forward 1 space each time it says you have cleared a path ahead.
2. Once you are free, kill one (or more) of the slaves walking on the road. They are all dressed like peasants.
Grab the purple "Ogre messages" that they drop. If you try to read the messages, you find it is all mixed up and garbled!
3. Go to Hamgyong Nam-Do to Ugh's home.
Talk to Nyogh (020,021) about the Ogre message. Nyogh remembers something about ancient Ogrish and that there was a scholar named
Haguru who wrote a book about ancient Ogrish. You'll have to find Haguru. You may remember him from doing the Du Mountain quest as a
very young adventurer.
4. Go to Arctic land, then over the river all the way west then north to
Du Mountain (0004, 0000). The man you see is Haguru!. Say his
name and he will tell you that the Sanhae Mayor has his Ogre book.
5. Exit Du Mountain and go to Sanhae Pass (0053, 0020). Go north to Sanhae Village and talk to the Mayor who is in
the town hall (0034, 0018).
6. Ask the Mayor about Haguru and Haguru's book. He will tell you that an ogre left him a collection of books.
He will generously offer to sell you a book for a small fee. Don't try to get away with paying less than 10,000 coins! He will then tell
you that Daewhan bought many copies of the Ogre book! Do you remember who DaeWhan is from doing the Leviathan Quest? Use the Ogre book
to start learning!
7. Go to southeastern Nagnang (0134, 0155) to enter the Leviathan area. Go south till you get to the
Leviathan Fields. Daewhan is the gray leviathan in the center.
8. Speak with Daewhan about the ogre message. He is happy to help someone who saved his people. He will teach you
to be fluent in the ancient Ogrish language (for a temporary period of time). Now you can read the message(s) you got from the slave(s).
(If you forget how to read Ogrish, you can speak to DaeWhan again to get a refresher course without having to buy another book.)
NOTE: If you have problems with any portions of the North, South or Rebel Camps it may be that you have forgotten how to speak or read
Ogrish! Go bach to DaeWhan and take a refresher course to make sure that isn't your problem! You slaves are so forgetful!
South Camp
Prerequisite:
Slaves cannot wear anything of their own! Shave your face and take off that wig!
Items needed:
1 axe, 3 slag, Completion of the Desert walk-thru above
1. Back to the Western Forest! Use your axe again to cut through the bushes. DO NOT kill any slaves now. Go south until you reach the South Camp. Several nasty ogre guards will shove you around but DO NOT fight back or they will kill you! Instead wait till they throw you into the slave pen.
2. For the rest of the time you are in this camp do not speak. Slaves must be silent. Drop all of the ogre messages you have and take off every item you are wearing. Click the purple Ogre guard in the center of the pen. He will give you some slave clothing and tell you to go south to the slave training area. Put on the slave clothing and nothing else before you walk south.
3. Click the brown Master Ogre to begin your training. He will tell to you to take messages to the various ogres in the training area. You have to find the correct ogre and click it. Then go back to the Master Ogre for new instructions. Keep doing this until the Master tells you that your training is complete. Go south to the Slave Quarters.
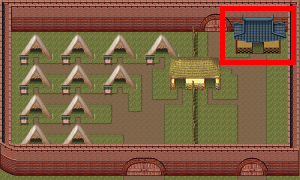
4. This Master Ogre is green, click him. He will give you orders to deliver messages to various ogres around the camp. (Use your new knowledge to read some of the messages just for fun). You will have to find the correct ogre and then click him. To make sure you have the right one look at him first (stand next to the ogre facing him and use the ; key to look). If you tap the shoulder of more than one wrong ogre, you will get thrown out and have to re-enter the forest and go through training again. Once you have given the correct ogre the message, go back to the Master Ogre for another task (0049, 0008).
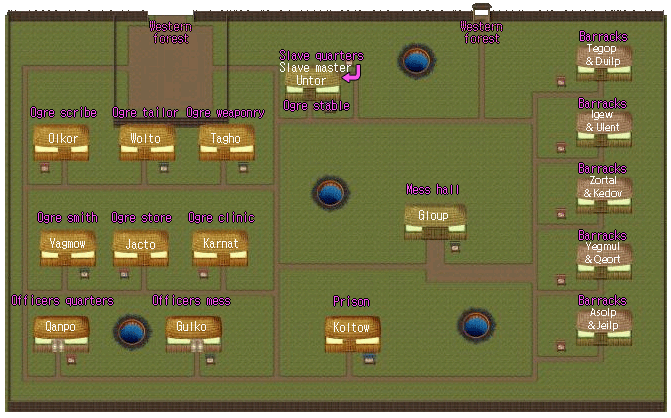
| |
|
[Place] [Coordinates]
1 - [Master] [0049, 0009]
2 - [Stables] [0045, 0013] Untor
3 - [Weaponry] [0032, 0022] Tagho
4 - [Tailor] [0020, 0022] Walto
5 - [Scribe] [0008,0022] Olkar
6 - [Smith] [0008, 0038] Yagmow
7 - [Store] [0020, 0038] Jacto
8 - [Clinic] [0032, 0038] Karnat
9 - [Officer Mess] [0028, 0051] Gulko
10 - [Officer Quarters] [0007, 0051] Qanpo
11 - [Prison] [0051, 0051] 1st room Koltow, click Koltow
before going to the 2nd room; Yanpow in 2nd room
---- [Barracks] ----
8 columns of beds, 12 rows of beds
12 - [A] [0089, 0010]
Duilp (black) - column 4 row 9 (015, 027)
Tegop (white) - column 2 row 7 (010, 025)
13 - [B] [0089, 0020]
Igew (dark brown) - column 6 row 5 (025, 015)
Ulent (light brown) - column 8 row 1 (035, 003)
14 - [C] [0089, 0030]
Kedov (green) - column 1 row 3 (002, 008)
Zortal (blue) - column 3 row 4 (013, 013)
15 - [D] [0089, 0040]
Yegmul (orange) - column 5 row 6 (021, 019)
Qeort (red) - column 7 row 2 (034, 006)
16 - [E] [0089, 0050]
Alsop (black) - column 2 row 1 (004, 004)
Jeilp - column 8 row 9 ( 037, 028)
17 - [Mess Hall] [0063, 0034]
|
Rarely you will be asked to deliver a message to the Ogre in the tent in the North Camp. Exit the south camp by way of the gate and walk north until you enter the North Camp. Go straight inside the tent to deliver your message and NO WHERE ELSE!
DO NOT attack any of the ogres walking around the camp or you will be thrown out and have to do your slave training all over again.
5. Eventually the Slave Master will give you a message for Yanpow at the Prison. (Do not confuse Yanpow who is in the 2nd room with Koltow who is in the 1st room. Both are at the prison.) It will take a long time to get the message for Yanpow so be very careful unless you want to start over. Go to the Prison, click Koltow in the first room to get permission to go to the second room. DO NOT click Yanpow to give him the message. Instead quietly walk to the far east side and wait until Yanpow walks to the west and you can no longer see him (remember that slaves do not talk).
6. You may notice that one of the slaves in the prison looks a bit strange but you are not sure why. His name is Soo and he is a Gypsy friend of the Gypsy Father in the desert camp. You must complete the Desert portion of the quest first because Soo will only talk to friends.
Keep a watch out for Yanpow. If Yanpow can be seen just wait for him to walk away again. Once you are positive that Yanpow is not visible, say "Soo". Agree to help him. Say "Soo" a second time. Give him the 3 slag. Just to be sure say "Soo" a third time. When he no longer responds to his name, say "Cazelle". Soo tells you how Cazelle forced himto forge Metal mounts and that he has no idea what the metal mounts are for. While you are there, you may as well get Soo to make one for you! Say "Mount" and he will make one for you. The Metal mount appears in your inventory. (You no longer get a legend mark for this part of the quest.)
Rebel Camp
Items needed:
1 axe, 1 slave garment, 2 Viperhead woodswords (buy from a smith, 150 coins
each), several free spaces in your inventory, (optional) 10 Yellow scrolls and a horse
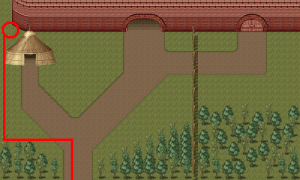
1. Return to the Western Forest if you have left. Walk north until you reach the North Camp. Ease your way around
the tent to the west to find the Rebel Ghost who tells you about a secret Rebel camp! He should also tell you that in order to get past the
guards at the castle gates you must be sprinkled with a powder to become invisable to the ogres. Do not leave until the Ghost tells you
about the powder. (Avoid the ogres which can kill you, follow the red line to the ghost above the tent.)
2. Head south to find the Rebel Camp entrance at co-ordinates 050, 209. It is a short, winding path through the
trees until you break out into a clear area. Use the Yellow scrolls to mark the path through the trees because when you come back you will
need to hurry through quickly. Follow the clear area until you enter the Rebel Camp.
3. Click the Rebel Slave Leader to give him the 2 Viperhead woodswords. (This is the one that is moving slowly.)
The Rebel Slave Leader will tell you about an attack the Slaves have planned. Wait for midnight because he will not sprinkle you until the
attack starts. When the Slaves start their attack, quickly click the Rebel Slave Leader to get sprinkled.
NOTE:
It is VERY important that you do this at the correct time! Right click the "time icon" on the bottom right side
of your screen to find the nexus time. When the slaves around you equip their swords and start running to the north it will be
midnight (00 nexus time). That is when you should click the Rebel leader to be sprinkled with the powder. Do not
follow the rebel slaves; they are providing a distraction for you to enter the Ogre Stronghold via the North Camp. Click the icon
below for time conversion information.
|
4. Run as fast as you can (bring a horse to make it faster if you like) to leave the Rebel Camp. Follow
the Yellow scroll markers you left in the trees to find your way back to the road. Get to the North Camp while it is still midnight
and don't worry about the Ogres because the Slaves are attacking them to the east and they distract the guards from paying too much
attention to you plus you are invisible to the ogres now!
Additional Information:
You must enter through the west corner of the gate
in the North Camp to get to the Generals camp
5. Be sure you are wearing ONLY your slave clothing and that you have not killed any slaves before you
enter the gate. Inside the walls you will see several tents; checking them out you find they have been set up for the Generals and each
tent has a locked chest. Go outside and enter the doorway on the east side.
6. Click the green ogre in the Kitchen. Pay no attention to anything he says out loud. Click Yes when
he asks if you are ready to help. Click Yes again when he asks if you know how to serve wine. Walk in front of the tables lining
the east side and wine will automatically fill every empty inventory slot.
Generals Camp
Items needed:
3 slag, slave garment, as much wine as you can carry from the Ogre Kitchen
1. Exit the eastern door of the Kitchen and enter the building outside. There are several Generals feasting as they stand next to tables. Stand where you can see at least two Generals if not more (your objective is to serve as much wine as fast as you can without messing up). The Generals will command you to serve wine when they are thirsty by saying, "(your name) more wine please". Click the General who spoke and NO other General. One wine will be given and you keep serving until you run out of wine. Leave the building as quick as you can before someone asks for more wine!
|
NOTE: Turn off all whispers, clan and group chats, shouts and anything
else that may distract you because this is the point where almost everyone
fails. Try to position yourself where you only have to serve 1 or 2 ogres.
Stand just inside the door so you can quickly leave when you run out of wine.
You do not have a lot time to click once they ask for wine so pay
attention. If you fail to click in time when asked to serve wine, you will lose
your slave clothing and be booted back to the wilderness. You will have to
start over with slave training to get another slave garment but you won't have
to deliver messages. You can start at the Rebel Camp walk-thru once you finish
the first part of your training. (See Step #3 South Camp)
|
2. Go back to the Kitchen for more wine. Keep collecting and serving wine until you get a popup message in the kitchen saying that you can find no more wine (you must get this message to complete this section).
You must click the Chef after you finish giving the wine before you leave the North Camp because you can't get back in without the sprinkles unless you click the Chef.
|
Side information: If you click on the Black ogre guard to the north you get two responses. If you click on the left it says, "You see a sturdy ogre guarding the gate". If you click on the right he says, "HALT! You may not get by without a pass".
|
3. You are finished with your tasks in the North Camp so go back to the Ogre Master in the South Camp. The Master will express surprise that someone as miserable as you has managed to please the generals. He assigns you to work in the North Camp permanently which means you do not ever have to get sprinkled in the Rebel Camp again.
4. Go back and click the Ogre Chef in the kitchen. He will repeatedly try to send you on errands requiring you to collect minor food items such as Meat scraps or Snake meat but you don't have to bring any of these items. While he WILL NOT ask you for a Mud fish, that IS what he wants. He mutters out loud about a Mud fish and that is the clue needed to find out what he really wants. A MUD FISH!
5. You can fish for this item before you start this part of the quest: Say "Mud fish" to Wim, the fishing NPC found in the curve of the river near Buya's east gate. It is best to use the 1000 coin rod and 500 coin bait options until you catch a Mud fish. It is rumored that fishing as close to midnight (00 hour) will increase your chances of catching this elusive fish.
6. Go back to the Ogre chef and hand him the Mud fish. He is happy that he can make the Mud stew now and asks you to return later when the stew is done (one hour real time). [Use shift h to hand an object to someone.]
7. Wait for one real time hour before you click the chef to get the Mud stew. He also will give you an Ogre pass which you need to get past the Black guard to the north.
8. Exit the east kitchen door and walk north until you see the RED General. Click him and he will thank for bringing the stew. Being somewhat ogrish, he isn't happy and wants you to bring him some crackers. So that you will be able to get back to him, he will give you an Ogre pass and a key to open the chest in his tent.
9. Go visit Soo in the South Camp. You do not need to have a message because you can freely walk in now that you are a valued slave. Wait for Yanpow to walk away and say "Key". Using his smithing skill, Soo uses the slag to make a copy of the key.
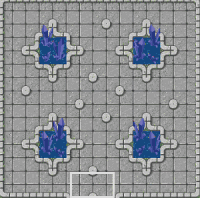
10. Go to the North camp in the tent area. You will need to find the crackers found in one of the tent's chests. And while you are at it, you may as well check other chests to find what you can! (Since you only have two keys, be careful to only search the tents shown below for crackers and and a blank ogre pass - the other tent items listed below are just stuff you don't need). Use the table below to find the correct tents where you can find the ogre pass and mud stew crackers. (See the map at the top of this section.)
|
Row 1 |
|
1. Tent |
|
2. Blank Ogre Pass |
|
3. Comb |
|
4. Apple |
|
Row 2 |
|
1. Mud stew crackers |
|
2. Wine |
|
3. Wine |
|
|
|
Row 3 |
|
1. Tent |
|
2. Wool |
|
|
|
|
|
Row 4 |
|
1. Soup bowl |
|
2. Wine |
|
|
|
|
11. You briefly wonder what to do with a blank ogre pass when you remember that Dae-Whan knows how to write Ogrish! Go visit Dae-Whan in Nagnang and say, "Pass". He is only too happy to make you a permanent ogre pass. (Just to make sure you aren't losing any knowledge say, "ogre" to him for a refresher course on ancient ogrish).
12. You wish you could rest your tired feet but instead you go back the through the North camp and click the RED general. Give him the Mud fish crackers.
13. Good slave that you are, you go back to the chef for more orders. The chef directs you to the Ogre Master in the South camp. The Ogre Master will now give you two messages and another pass. Just for fun, practice your reading. The Master wants you to see the RED general to have the pass validated. So off to the North camp you go.
14. You finally get a break when you click the RED general because he is in such a hurry that he not only validates the Master's pass but also the permanent pass Dae-Whan made for you!!
15. Nothing can stop you now! Follow the path past the RED general until you see a WHITE guard at the fence. He sees that you have a pass so he lets you through. Carefully cross the battlefield and exit to the north.
Temple
Items needed:
1 axe, slave garment, permanent ogre pass
TIP: Bring a horse to speed through the temple - it can be an extremely long walk! There are tons of ogres in each room and they thirst for your blood! Know which direction you will be heading towards and get that horse running before they chase you down. They can be very hard to kill.
1. You are amazed to see a Great Temple with steps seemingly leading to the sky! There are many Staffs of the Elements decorating the sides of the steps. (The direction the staves point is important because that is the direction you must travel inside the temple - not to worry, the directions are given below - just don't take a wrong turn! Oh! You don't have to wear the slave garment once you reach the temple.)
Directions:
Up Up Right Right Down Down Left Left
Up Left Up Up Left Left Down Left
Down Left Up Up Left Right Left Right
Up Right Down Right Right Down.
Yes it is a long trek and you will sometimes re-enter rooms you just left. Just follow the directions and you will do fine.
2. Finally ending your long walk you enter the golden Shrine of Fire where the Fire Lord lives. Click him to learn that his passion burns too hot and that he needs to find a way to harness it. Go off you go to find a "harness". Exit the Shrine and this time you follow the directions backwards just like the staves on the steps showed.
Directions:
Down Down Left Left Up Up Right Right
Down Right Down Down Right Right Up Right
Up Right Down Down Right Left Right Left
Down Left Up Left Left Up
Again do this precisely. If you make a wrong turn you will find Ugh and his wife Panda's new home where they are hiding from Cazell. Visit for awhile and tour their garden if you like. When you re-enter the temple you start from the first room at the top of the steps. Use then proper set of the directions to get to the shrine you need (e.g. if you want to find the Shrine of Ice, go down first - this does not exit the temple!)
3. You finally reach the blue Shrine of Ice where the Ice Lord lives. Click him to learn what he has to say then exit and go back to the Fire Lord. Re-trace the steps you took above just in reverse just be quick about it since the Ice Lord's blessing will not last long and you may have to start this section again.
4. The Fire Lord has what he needs now so he forges the Fire of Passion for you which appears in your inventory! (You no longer get a legend mark for this part of the quest.)
Forging the Staff of the Elements
Items needed:
Water jewel, Wooden staff, Earth shard, Metal mount, Fire of passion, Angel tear karma, 20 ginko wood, 50,000 coins
1. Find the Random merchant
in either Buya or Kugnae. You need him to ask you for 50,000 coins. He can usually be found in places where not many people walk
so follow fences, walls or bushy areas. Note: Random Merchant can be found alive/dead/mounted. You MUST write down the element and animal name he tells you because it is the
only time you receive this information and you need it! (See the image below).
2. Go see the Miner Thane in the wilderness. Bring all five of your elemental items. Thane first rambles about Cazell getting what he deserves, then speaks of a machine, a forge, on which they created a Staff of the Elements. Cazell later destroyed the Forge, and ran off with the staff...
Say, "Cazell", "Machine", "Repair", "Staff of the Element". Say "Repair" one more time and offer him the Ginko wood to repair his machine.
3. Say "Repair" a third time and he will tell you to stop bothering him and to go away. He says you can back back in 12 hours (1 hr 30 min real time).
4. Go back to Thane after 12 nexus hours and say "Machine". If he is finished fixing his machine, you will get a popup message. Thane warns you that the machine may not work (no one has ever seen it fail). The machine has two dials. One for animal names and one for element names. Turn the dials until the element name and animal name the Random Merchant gave you are showing. Your newly forged Staff of the Elements appears in your inventory and you have a new legend mark!
Total Items Lost to Sacrifice:
|
81,500 coins
Salt Block
2 Water Jugs
Acorn
Axe
Amethyst
Dark Amber
Hot Coal
Mudfish
26 Water Skins
6 Slag
2 Viperhead woodswords
20 Ginko Wood
10 Yellow scrolls (optional)
Horse (optional)
|
|
Total Rewards:
|
Legend Mark: Forged the Staff of the Elements
(original legend marks)
Legend Mark: Made Water Jewel
Legend Mark: Formed Earth Shard
Legend Mark: Molded Metal Mount
Legend Mark: Harnessed Fire of Passion
Legend Mark: Forged the Staff of the Elements
|
|
|
|